


Step-by-step guide on replacing desiccant in desiccant air dryers to restore dew point control and improve compressed air system reliability.
Why air dryer desiccant replacement matters?
Whether a production line runs smoothly often depends on how well the desiccant air dryer is performing, and that performance, in turn, depends heavily on the condition of the desiccant inside the towers.
However, the performance of any adsorption air dryer depends heavily on the condition of the desiccant material inside the towers. Once the desiccant becomes saturated, contaminated or aged, the dryer will no longer achieve the required dew point. The downstream equipment will eventually feel the impact—sometimes gradually, sometimes all at once. This is when replacement becomes necessary.
When should the desiccant be replaced?
In most setups, the desiccant lasts around 10,000 hours, or roughly a year to a year and a half of operation. This isn’t a fixed number—dryers that handle cleaner air tend to stretch beyond that, while systems with higher humidity or oil carryover usually hit the limit sooner.
The first signs of aging are generally subtle: a dew point that’s a few degrees higher than usual, a dryer that switches towers more often, or a slow rise in pressure drop. If these trends keep going, the desiccant is probably past its prime.
How to replace desiccant in a desiccant air dryer
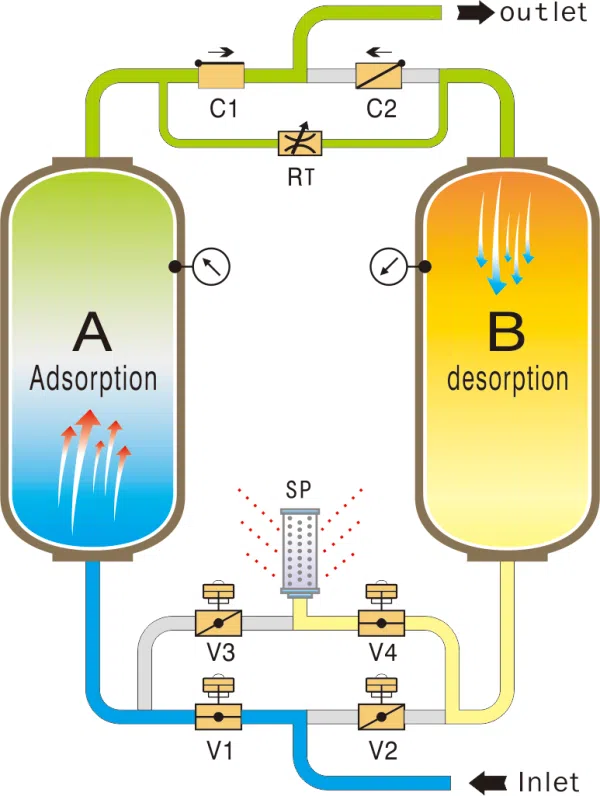
(Desiccant air dryer working principle)
Important notes before filling new desiccant
Replacing desiccant in a desiccant air dryer it is not complicated, but it’s also not something you want to rush through. The tower needs to be emptied from the discharge port, and depending on how long the desiccant has been inside, you might have to help it along gently because tightly packed beds can hold onto their shape.
While the tower is open, it’s a good opportunity to pull out the coarse filter screens at the inlet and outlet joints. These screens trap dust and broken particles over time, and giving them a proper cleaning helps prevent problems after the new desiccant is loaded.
How the desiccant is filled makes a noticeable difference in the desiccant dryer’s performance. A bed that isn’t evenly packed will develop small airflow channels, and once that happens, the air takes the easy path through the tower instead of spreading out and contacting the full bed.
Even brand-new desiccant can’t compensate for this. Vibration filling is usually the safest method because it lets the beads settle naturally without gaps. We also avoid poking or compacting the bed with hard tools, since crushed beads create fines that eventually clog the filter screens
Once the towers are refilled to the correct height, the filler ports are sealed, and every joint that was opened should be checked for leakage. After that, the desiccant air dryer can be put back into operation and monitored for dew-point stability. If everything was done properly, the improvement is usually noticeable right away.
Step-by-step guide
1. Open the filler and discharge ports: Each tower of a heatless desiccant air dryer has designated ports for unloading and refilling. Remove the cover plates and ensure the desiccant air dryer is depressurized before proceeding.
2. Discharge the old desiccant: If necessary, insert a small rod gently into the discharge port to help the media flow out. Because the desiccant is tightly packed, some bridging may occur.
3. Remove and clean the filter screens: Every tower has coarse filter screens at the inlet and discharge joints to prevent desiccant dust from entering the system.Remove these filters (after taking off the upper and lower gas-collecting pipes) and clean them thoroughly.
4. Reinstall the cleaned filter screens: Once cleaned and dried, reinstall the filter screens securely and close the outlet plugs.
5. Fill the tower with new desiccant: Use desiccant matched to the model and specifications of your dryer.Fill to the height indicated in the manufacturer’s filling table, making sure the media is compact and evenly distributed. Vibration filling is ideal for achieving a uniform bed.
6. Seal the filling ports: After both towers are filled correctly, re-seal the filling ports and ensure all plugs are tightened evenly.
7. Perform leak testing and restart: Any joints that were opened during the replacement must be checked for possible leakage.Once verified, adjust the desiccant airdryer back to normal operating mode and observe its dew-point performance to confirm the replacement was successful.
Conclusion
In general, the life of the desiccant depends less on the desiccant air dryer itself and more on the air going into it. Oil contamination, high inlet temperatures and wet air upstream all shorten the replacement cycle. A good pre-filter, stable regeneration system and proper maintenance habits go a long way toward keeping dew-point performance consistent and avoiding unnecessary downtime.